Monthly Archives: November 2010

WIP it Wednesday

Kittens, apparently setting low, arbitrary goals helps productivity. Who knew? Last night I knit 05 rows on one project and 06 on the other. This morning, I’ve knit 02 rows on the first project and 04 on the second.

Go figure.


My Skull and Flowers mitts are coming along nicely. I’m still trying to decide if these will be fingerless mitts or actual mittens. I’m trying to determine the actual need for mittens down here. Warm wrists I’m sure I’ll need. But will my fingers actually get cold? Hmmm.

If you look closely at the picture, you can see where the blocked portion of the mitt ends and it pulls back in a bit.

And the neckline has been started on my Honeybee. With any luck, this will pick up pace now that I’ve bound off a large number of stitches for it. In a few more rows, I’ll be doing decreases in the sleeves every row instead of every right side row, so it will start to fly at that point. The end for this knit is creeping up.

And that’s what I have for you this Wednesday.

Small Goal

My knitting mojo is practically non-existent this month after a rather sad end to October. It’s not looking to be getting any better after doing my weekly weigh in. Truly, it was depressing how low my numbers were. So I’ve decided to set a small goal to keep me moving and hopefully pop out a couple of FOs this month: finishing things always lifts my spirit and gives me the oomph needed to work on something else.

So here it goes: Until my Honeybee Cardigan & Skull and Flower mitts are off needles, I plan to knit at least 2 rows per project per day.
A little progress is better then no progress at all. So far today, I’ve already knit 3 rows on the mitts, so hey, that’s something. I really want something to show off for WIP it Wednesday. It will not be the cardigan, since it looks pretty much the same as it did the last time I posted it. Maybe if I try to display it in a more artful way….

Alterations: A Sorta Tutorial

Changing pace today, since I actually used my sewing machine for a quick project yesterday. I’ve been finding more sewing blogs to follow lately–particularly ones about altering tee shirts and pre-existing items–and a couple of them had tutorials up for how to convert little girl’s tee shirts into long sleeved ones with outgrown leggings. Because raising a girl right now, it’s all about leggings and I’m willing to bet that everyone has some. In fact, The Girl had just outgrown a few fun pairs and some were too short now that Fall seems to have landed in Alabama. So I took a quick glance at how it was done and decided to try it out on my own.

First, I picked out a favorite short sleeved shirt and a pair of leggings that coordinate nicely with it. Gotta love the clearance section: I believe I snagged those leggings for $1.99 at Old Navy back in the day. I loved the fun print and the button details on the legs. And like all good Americans, I’m a sucker for a clearance rack. For cheap clothing alterations, that’s a good thing.

At this point, I pulled out one of The Girl’s few long sleeve tees she owns–one that happens to be in the same style as what I’m making–and I took the measurement from the seam on the arm cuff down to the opening of the sleeve. (Since that was where I planned to sew the new sleeve to, I figured it was a good place to measure from.)
I then laid the leggings out flat on my rotary mat and cut the legs off just a little longer then the measurement I took. I believe I did something right in the middle of 9.25″ and 9.5″ ( 9 3/8″ ?) for a measurement of 9″ on the original shirt sleeve. I wanted to make sure that I didn’t accidentally short the sleeve by doing the exact amount.
Since the sleeve was going to need to be tapered–the leg opening was much wider then the sleeve opening was–and I didn’t want to touch the side with the buttons, I pinned the leg to the cuff starting on the button side. (I attempted to make the buttons facing out and this didn’t quite work out how I thought it would.) This left the excess leg on the side. I marked where I wanted to start sewing with a vertical pin and then sewed from there. I didn’t use a guide, just gently tapered down the leg, but I’m not as picky about accuracy with some things. Your mileage may vary.

Comme ça.

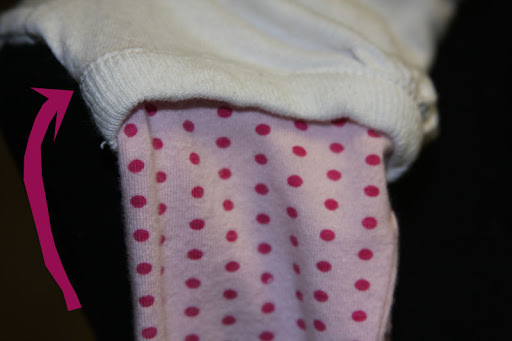
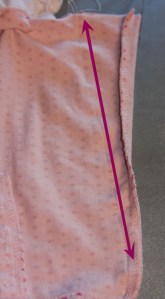
I used a line to show more clearly where the seam was sewn to take the excess out of the leg. (On this particular leg, I could have started a bit closer to the sleeve, since I had to fold it in a bit to make it fit. I remedied that the second time around.) I then took my rotary cutter and trimmed the excess, leaving a small amount of fabric outside of the seam.

Then I went to my sewing machine and with some finagling got it properly set up to sew the sleeve into place. I used the “rim” of the cuff as a guide to line the jersey up to and used the little indentation on my sewing foot to align that all with. The seam allowance on the inside is very thin, but I wasn’t too worried about it for this project.
When all was said and done…

this is what I had. I used another lovely arrow to point out that seam on the cuff I’ve been babbling about.

Then I repeated the project for the other side and TA DA!

Super cute new fall tee shirt for The Girl. She did not feel like modeling for me so I could get a decent picture: this is as good as it got last night.

Start to finish, this project took less time then it did for me to write this blog. It was all done in less then 20 minutes. I will definitely be doing this again with a few more pair of favorite, but no-longer-fit leggings and equally loved short sleeve tees.

Why Reading The Label is a Good Thing

If you don’t, you end up with a partially felted blanket/project. (Felted portions have raspberry dots next to them to point them out.)

I was going to write a yarn review, because I SWORE this yarn claims to be superwash. Before going off though, I decided to check the Ravelry page, which led me back to the page from the online store I purchased it from. Sure enough, it says it is not superwash as I believed. So there goes my ammunition.
This is Yarn Love Anne Shirley and was washed in icy cold water on the gentle/handwash cycle. Yeah. Not superwash at all. In fact, I’m wondering how it would have fared being handwashed.
The colors are gorgeous. The yarn is lofty and soft. Even the felted sections are lovely and snuggly. Since the washing mistake was mine, I can’t think of anything negative to say about the yarn, since I should have known better. I didn’t even run into any schlubby bits in the skeins.
So there you go.

Inspiration

I have yet to knit from them, but my Japanese knitting and crochet books are a huge source of inspiration for me.

How could I not be inspired by them? The patterns are intricate and beautiful. They’re photographed and styled beautifully. American magazines could definitely learn a thing or two from Japanese craft books.

03 new ones arrived today and I’ve been gleefully paging through them and making mental note of all the patterns I want to get to when I have the time to adjust for size and have the proper stash to work with it (06 in one, 04 in the second, and 02 in the third). The curious can go check my library on Ravelry: I’ve already found them in the database and added them to my collection.

Time to pump out those hand dyes and get some beautiful solid neutrals into stash.

Trials and Tribulations

My current project is causing me some angst. I can not seem to buck this with knitting lately. It’s almost enough to make me want to switch gears for a bit, but I must knock some more projects out before I can. My tote may have had some erm…augmentation recently and it won’t all fit again.

Anywho. The offending project:

I managed to get in on the Skull and Flowers Mittens KAL, where if you signed up before 04 November, you received the pattern for free. My yarn arrived 02 days ago, and I decided to cast on right away, since I’m super excited about these.

I have not done a lot of colorwork. What I have done has been 2 colors per row for the most part.
Now, you kittens may be asking yourselves, “Why is that knitting in a bowl of water?” Good question. I was checking to see if upon blocking, a) the stitches would even out and b) I could block the cuff just a bit larger. Because you see, kittens, my gauge is spot-on for the smallest size, which I need for my actual wrist and most of my hand measurements, but the width of my hand is in between the small and medium. Trying to test out the mitten yesterday, it was a struggle to get it over my thumb. After the thumb, it fit beautifully. My floats are not tight and I’m purposefully not keeping my tension as I usually do. But, it was an issue.
Which makes me wonder, is this normal for colorwork mittens, or is it a sign they are too small and I really should cut my losses? I was able to block them just a touch bigger, which meant slightly less of a struggle getting them over my thumb, but they do not easily slide over either.
Bueller?

04 November 2010

Since I’m lacking the oomph needed to do a crafting related post today (should have one tomorrow if all goes well with what I’m working on… I’m still waiting to see if it’s turning out or if it needs to be frogged), I thought I’d use this day to plug my other blogs. Since I’m a bit OCD and do not like my topics mixing, I have individual blogs with different purposes.

This one, obviously, is a crafting blog and my most updated one. Mostly it contains knitting and crocheting, but there are also embroidery and sewing possibilities. When I want to muse about something crafting related, it goes here.
My next most updated blog is my gluten-free cooking/baking one: The Food Blogger Wannabe. Because seriously, I do fantasize about being a food blogger, but I take far too long to post and often do not have original content to post.
For non-private, general life posts, I’ve started Contradictive Tendencies, but I haven’t done much with it yet. I’ve been meaning to post more in there, since I do have some material, but postings of that nature are more involved then crafting. You need more content and focus then I need for this blog.
I also have an as of yet unposted to art blog, but I may change the title of it. I used to have a DA account, but decided to close it out several months ago. I have been focusing on crafting more then anything else, so I haven’t had content to get it started yet.

WIP it Wednesday

Have one for you all today, Kittens. Though, the picture isn’t very good; the weather just will not cooperate, and it’s a lovely, chilly, rainy day. I adjusted the color levels as best I could. They’re definitely better then the last picture of this project, where I didn’t even bother to color correct.

I’m making progress on my Honeybee, slowly but surely. The very short sleeve is attached to the body and I’ve finished the underarm decreases. Today, I set up to start the rest of the arm. With any luck, I’ll finish this up sometime, but I may take a short break to focus on other things and rally my enthusiasm again. For whatever reason, I have never been able to get into this sweater: for a cropped, short sleeve thing, it is taking forever to knit.

Maybe it will be done by the end of November….

FO Round Up…

Hats edition. Very little knitting happened in October, but I do have a couple of FOs to blog about. Both were improvised, so I will not be using my usual format to link to a pattern.


First up is The Boy’s winter hat. Due to some training The Husband got into, the children and I are heading up to Wisconsin for a short late-November trip. Of course, this means the children will need actual late fall/early winter gear to keep their delicate southern selves warm. (For real, The Boy complains about how cold it is after the temperature dips under 75º. My Sconnie heart cries every time he does it.)

He wanted a red and blue striped hat, and I already had the blue–frogged some of his sweater from last winter that he outgrew, so I ordered up a skein of red Malabrigo to match and got to work. I used US size 8s and cast on 84 stitches. Nothing fancy. Since this hat used so little yarn–less then 1/4 skein of each color, I’m going to knit him an equally simple ribbed cowl. I’m debating if I’ll make it perfectly matching or not.

Next, we have The Girl’s Hello Kitty hat which was part of her Halloween costume this year. Again, this was improvised with a little guidance taken from another pattern to figure out how to knit the ears in the round and get the shaping correct. I did the same with the bow: peeked at a pattern, saw how it was done and then just did my own thing.
Overall, I really like this hat, but the yarn was way too heavy for the bow. The next time I try this, I’ll definitely use a lighter weight yarn for that part. This was knit with some Cotton-Ease partials I had in-stash and need to use up or send on their way. Cotton-Ease is fine for toys, but I’m not so enamored with it for garments. It’s a bit too thick and bulky for that and has a slightly odd, plastic-y, almost-oily feel to it from the acrylic content. ( I have some KnitPick’s Comfy in stash that I need to use that is the same fiber make up, but the feel of the two is way different.)
And that’s what I have for you this second day of November, Kittens.

NaBloPoMo

Ah, November. The month of many month-long events with silly names. This month, I’m going to attempt to participate in NaBloPoMo (National Blog Posting Month) and charm you all with an entry a day. I’m going to attempt it all on this blog specifically, so they’ll have to be crafting related posts. But that leads to the question, other then WIP it Wednesdays, FO posts, and the monthly tally on the last day, what on earth should I blog about?

Any ideas, kittens? Anything you’re dying to know?